We eat a lot of bacon. Even our vegetarian meals tend to have a strip of bacon. And I save every drop of grease. How could I not? I grew up with a mug of bacon grease in the fridge for frying eggs in the morning. This was ironic because we otherwise avoided animal fats (the fat-free craze was gaining speed at that time). Instead we used Imperial Margarine (Canada’s premier butter-substitute) for baking and ‘buttering’. Except for potatoes and popcorn – those were butter. I guess my parents just made this stuff up as they went a long.

The margarine of my youth
And apparently I follow in their footsteps, making stuff up as I go along based on the information available to me. I bake and spread butter, I fry coconut or olive or peanut oil. I eat lots of ‘healthy fats’ (i.e., avocados, nuts). But I never use the bacon grease.
For a few years I wanted to use beef fat to make soap. I had been making cold process soaps for a few years, always using plant oils. I inquired at a few deli/butcher counters for beef fat – which makes a hard, white soap, clean soap. But no-go. I gave up.
Meanwhile, the bacon grease continued to build up in the kitchen. And in the garage. Random yoghurt and ice cream containers stacked in corners, leaking. Occasionally I would relent and throw them out.
It finally occurred to me to make soap from the bacon grease. Duh! Except that I didn’t know how. Gods bless the Internets. Just a little bit of searching and I found a saponification value for bacon fat (the g/g ratio of lye needed to neutralize and convert particular fatty acids into soap molecules) and instructions on preparing the oil.
BUT! Just because I knew how didn’t mean I was ready to start – no, no, no! That is not how perfectionist procratinators proceed! I had to wait until Scott said ‘Enough – do something with these or I am throwing them out’. At last I could leap into action.
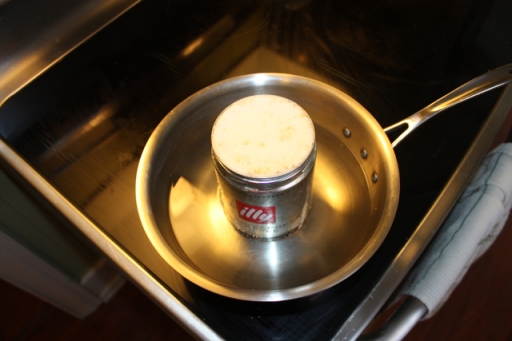
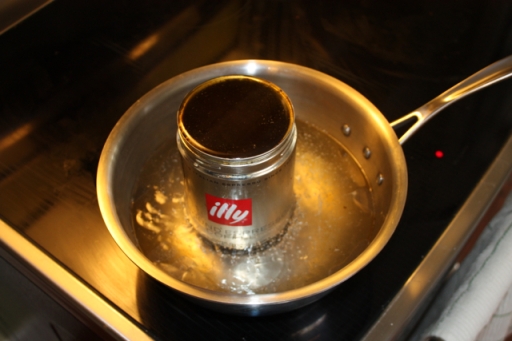
Can full of bacon grease ready to melt
The first step was to clean the fat. Anyone who makes bacon understands that bacon grease is ‘dirty’. It is full of crunch black bits and stinks. You don’t just want to throw that stuff into soap. So I started cleaning the grease.
Melted, bacon grease turns dark and transparent
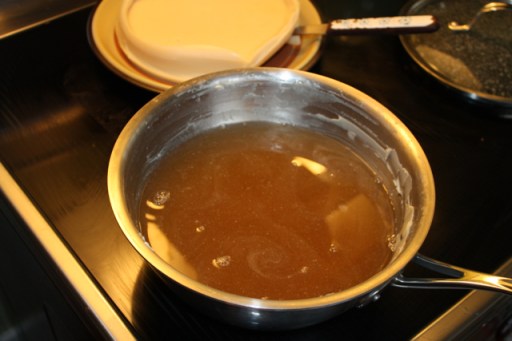
Step 1: Pour the melted bacon grease into the water and boil with salt (this instruction comes back to haunt me)
This steps produces the first miraculous transformation. I let the mixture cool after one hour of low boil; first in the ‘airlock’ and then in the fridge, until I had a firm layer of fat covering the top of my pot.
After first boil, a hard layer of dirty fat sits atop nasty dirty stinky chunky water
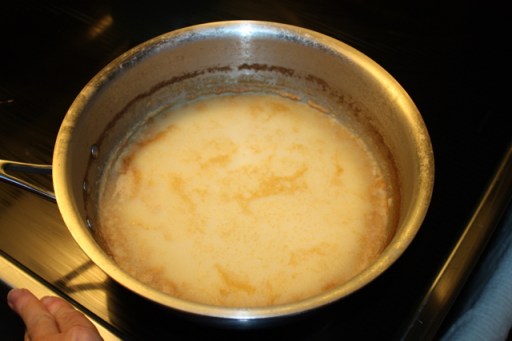
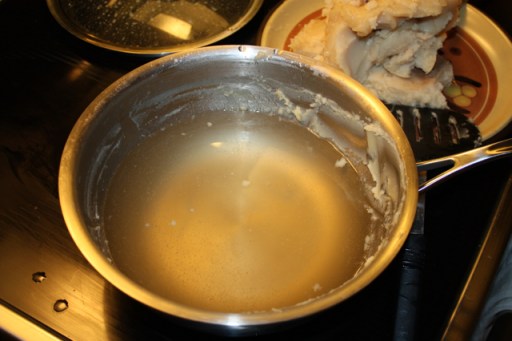
Step 2: Discard water and repeat with clean water
I pried the fat up and was able to lift it out with a spatula. Underneath was a nasty, smelly bit of brown water with chunks of meat (you vegetarians feel free to retch). I threw that in the compost and started over again. This time, the fat layer didn’t smell, there were no more chunks, but the water was a deep amber-brown and smelled horrid.
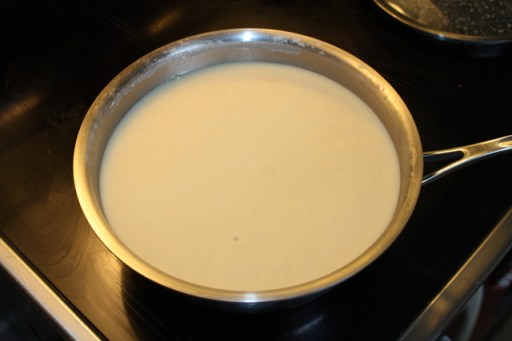
After the second boil, clean, low-odor fat
Firm fat layer removed from the second boil
No more chunks, but the boil water under the fat is dark and stinky
Step 3: Repeat until water is clean
The third time around, the water was nearly clear. But there was a problem: the fat layer was getting progressively softer, to the point that I could no longer lift even chunks of the lard out with the spatula. What was I doing wrong?
Third boil water is ‘clean’, but fat (in background) is too soft!
I had been wondering about the salt, added ‘to help absorb smell’. No one said how much to add. Well, what does salt do? Maybe by making the water more dense it helped the fat float to the top? I wanted good separation, so I reasoned that if some salt was good, more was better.

After a fourth boil, with even more salt – super soft fat!
When my fat was getting softer, not harder, I thought again. What else might the salt be doing? It breaks up the hydrogen bonds among water molecules. Could it be emulsifying the fat? Some inet searches turned up saltwater as a potential emulsifier of grease. Oops.
I re-boiled the bacon fat in water (no salt) several times, each time getting a more solid layer of fat. I stopped at ‘good enough’, with a nearly solid layer and very clean water. The fat layer, which had stopped smelling early on in the cleaning process, had reacquired some stink during the over-salting quilombo, but I decided to proceed. The fat no longer smelled of nasty old bacon fat – it now smelled like chicken stock. I could work with that.
Prior to this adventure, I have used a mixture of at least three (and up to six!) plant oils to make soap. It is a messy tedious process to prepare the oils – some are liquid, some solid, and each require precise weighing. By contrast, using bacon fat was simple. I just weighed my prepared patty, calculated the amount of lye and water I needed, and I was ready to start.
To calculate the amount of lye, multiply 0.1388 times your weight of fat. I had 710 g of fat, so would need 99 g of lye to completely convert the fat to soap. But I always superfat my soap; adding a bit less lye to a) ensure the lye is used up, b) make the soap more moisturizing. So I went with 85 g of lye. I dissolved this lye in twice as much water (170 g).

Cleaned bacon fat melting in soap pot
Soap Step 1: Melt the fat
You want the fat liquid, and warmed but not hot. For this recipe, the fat should be 88F.
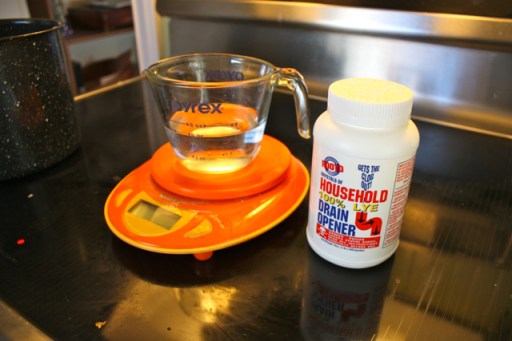
Measuring the water and lye
Soap Step 2: Dissolve the lye in water
Wearing protective clothing (especially glasses), slowly add the lye to the water, stirring ( I use my stainless steel thermometer). The exothermic reaction generates a lot of heat, so cool the lye solution in a cold water bath.
Soap Step 3: Add the lye solution to the fat
When the lye solution and the fat are about 88F, slowly add the lye to the fat, stirring vigorously (but take care not to splash).
Soap Step 4: Stir until ‘trace’
You can use an immersion blender to speed things up at this point. I wanted to see how long it would take to trace, so I stirred by hand for 20 minutes. I can’t say I saw trace, but there was no sign of separation, the solution was noticeably thicker, and I had to go to dim sum. Next!
Soap Step 5: Add essential oils (optional)
I debated leaving the soap plain, to see if it really had no odor, but – what if it did? Plus, it’s always nice to have a pleasant-smelling soap. So I added a few drops of rosemary essential oil and stirred the solution a bit more.
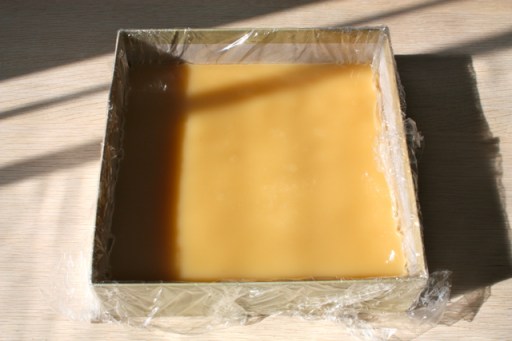
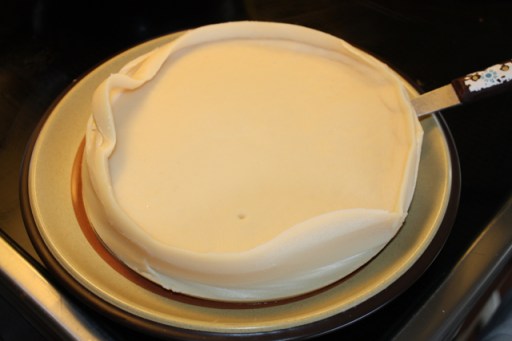
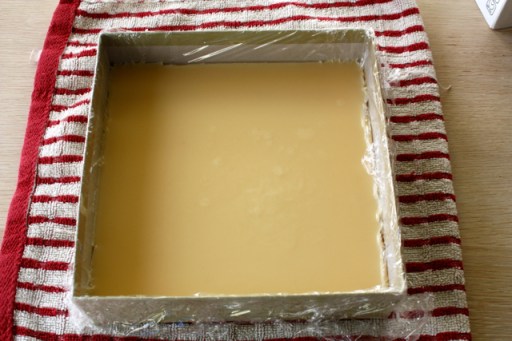
Vitreous quality of freshly poured soap
Soap Step 6: Pour into prepared mould
For my ~2c of fat, I used a 10″x10″ box, lined with saran wrap. Wrap the box in old towels (in case of any leaks) and store somewhere warm. If soap dries too quickly a powdery lye film can form on top.
Several hours after pour, soap is matte and becoming firm
Soap Step 7: When soap is firm, cut into bars
Check the soap periodically over the next day. Cut it when it is the consistency of hard fudge. Overnight is usually as long as you want to wait.

Next morning, soap is firm enough to cut
Soap Step 8: Wait 2-6 weeks for your soap to cure before using it
Although the physical changes are rapid (soap is firm within a few days), the chemical process of saponification is more slow. Right now the soap is still very basic (high pH) and will burn your skin if you use it. This is because there is still lye in the soap. It will take several weeks before the lye has completely broken down the fatty acids into soap molecules. At this point, the lye will be completely used up and the soap will be composed of soap molecules, glycerin, and some residual fats. Soap can be ready after 2 weeks, but 4-6 weeks is a safer period.
In May, I will let you know how the soap performs. So exciting!!
Lessons Learned:
- Using bacon fat for soap is awesome
- Most of the time spent cleaning the fat is waiting for it to harden
- Use a small amount of salt (~1 T for 2 c of fat) for the first boil only
- I am not sure lengthy boiling is necessary for subsequent steps
- 2c of bacon grease makes about 12 bars of soap
- I may never buy plant oils for soap again
UPDATE: The bacon soap was absolutely delicious on the skin – super soft without leaving a film. Unfortunately, the chicken stockish smell lingered – particularly in a warm shower. I found this a little…disappointing. So I re-milled the soap – grating the bars, melting them in water in a double boiler, dousing them with tea tree essential oil, and re-pouring. I am still waiting for the soap to dry (I added too much water), but will report back when I use the first bar.
UPDATE 2: Still stinky. Like burned chicken stock. I wonder if rancidity was a problem? I had been storing my grease on the counter and certainly it would have been rancid. So I am starting over, storing grease in a container in the freezer, just in case. Will try again when I have enough grease to start the cleaning…
UPDATE 3: Still waiting to accumulate enough grease. My breakfast cooker has gone off bacon for a while now, prefering some veggie patties with his eggs. As he is the cook, I can hardly complain. MEANWHILE, when I am ready, I will try this method of cleaning the grease. Hopefully it will be less stinky.