

I first read about using ollas in the garden from the DeVraies family, full-time urban homesteaders in Sacramento. They also made a good video of olla installation here.
I was immediately intrigued. “It rains a lot in Seattle”, but what few people know is that it doesn’t rain much, sometimes at all, during summer. Water conservation gets to be pretty important during the dry summer months, especially for gardeners.
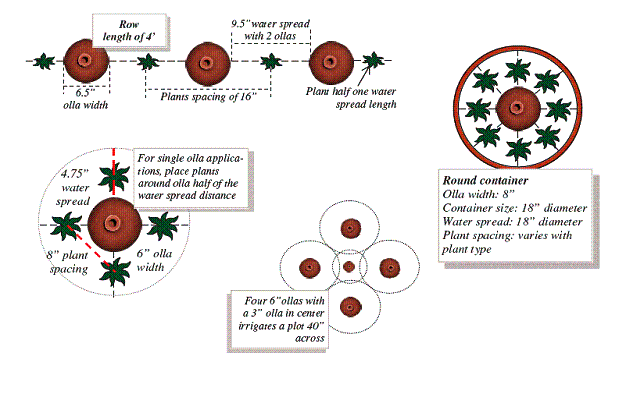
Furthermore, my garden is big, is far from my water source, and is awkwardly surrounded by anti-chicken fencing. Water pots that could increase efficiency >50% and only needed to be filled 1/week sounded awesome.
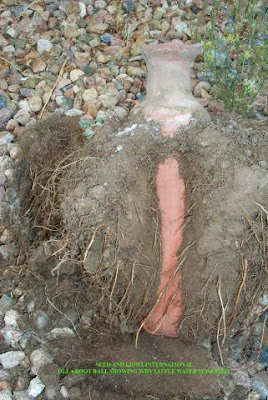
Enter the olla de barro; the clay pot. Here’s the deal. An unglazed, low-fired earthenware, like terra cotta, is porous. Water will seep from it. If it is fired just right, water will be drawn from it by the touch of something more dry, like fine soil or plant roots.
Garden ollas have bulbous bottoms and narrow necks. They are buried up to their neck, filled with water, and capped with something to prevent evaporation. Planting around the pot, within the seep zone, allows plant roots to grow towards the pot, sometimes enveloping it. As the plant roots suck water from the pot, the water level declines and the pot needs to be refilled.
Could I get some in Seattle? No. Could I order them online? Yes, but $$$. For this frugal graduate student the $$$ was a definite deal-breaker. Plus I’d need a lot of them. But hey, wait a minute. I’m a potter…could I make one?
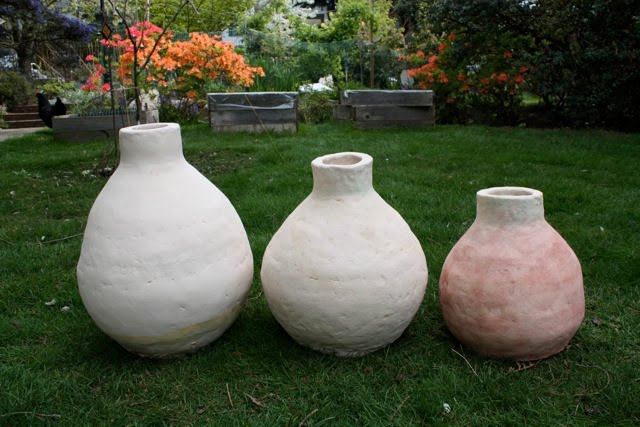
OK, I’m not that good a potter. I had no idea where to start. My teachers recommended I use a groggy sculpture clay and make the walls 1/2″ thick. I started with a flat slab bottom and hand-built the walls using rough coils. My first pots are big, heavy, thick-walled, and I have no idea if they will work.

For the first pot I used Akio, a sculpture clay that vitrifies at cone 6. My second and third pots are made from Buff Sculpture Clay from Seattle Pottery Supply. It vitrifies at cone 8-10. That’s really hot. ‘Vitrified’ is the opposite of porous, so I decided not to put my pots through a second firing. Bisqued (cone 06 ~ 1000C) they remain.
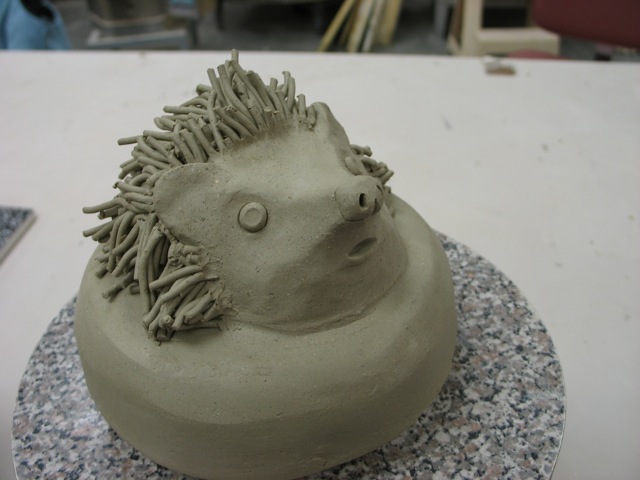
I made lids with funny animal heads, stained them with oxides and underglazes, then covered them with a low-fire clear glaze. I could fire them hot cause the lids don’t need to remain porous, but will just stick with the low-fire for now. I’ll post another pic when they come out of the kiln. [Update: Here they are!]
After all the fretting about clay bodies, firing temperatures, and matrix porosity, I’m thinking of building my next ones from a low-fired earthenware like terra cotta, hoping our lowest firing temp (1000C) will keep the body porous. Any advice would be great.
Check out this wonderful technical document from the University of Pretoria.


Those are sooooo awesome! I can't wait to see how the lids turn out! What a great idea!
I am very interested in ollas too. I am wondering how long the the cone 6 clay body held up?
So far so good for most of them. The first ollas that I built I have never removed. The collar of one of those just broke last summer (now sits on the olla a bit above ground level). Olla itself appears intact (still holds water).